There are different reasons to have a hybrid infrastructure. One of them can be that the HR is, for legal reasons, not allowed to move their mailboxes to the cloud.
But in this article I will not write about reasons why a hybrid mail environment could make sence.
I want to present a solution how to use O365 connectors.
Let’s start with what connectors are and for what they are good for:
Connectors are a set of instructions that customize the way your email flows. It controls the flow of emails into and from your Office 365 organization. Here is why you need to set up connectors:
- Enable email notifications from a printer or other non-mailbox entity.
- Enable mail flow between Office 365 and your on-premises Exchange environment.
- Apply security restrictions, or controls to mail exchanges with a business partner or service provider.
Why do we need to set up connectors?
The main reason is, if there is an on-premise Exchange environment and the company wants to subscribe to Exchange Online Protection (EOP) for mail protection (Malware) and SPAM filtering. Companies like to use this scenario for financial reasons and to be able to use the EOP service from Microsoft. If you would like to know more about EOP just follow this LINK.
Second reason is, if you have a scenario where the company has some mailboxes in Office 365, as well as some on the on-premises Exchange servers. Then the connectors are necessary for enabling mail flow between these two environments.
How does it work between on-premise and O365?
The connectors from Office 365 work fantastically in both cases. In the first scenario you have no mailboxes in Office 365 (Exchange online). You only have an Exchange Online Protection subscription and an on-premises Exchange Server. That’s where you need to setup an Office 365 connector to be able to use the EOP service. I recommend you to use the following mail flow:
EXC (on-prem) -> O365 (EOP) -> Internet -> O365 (EOP) -> EXC (on-prem).
By following this, the organization will be protected against Malware and SPAM.
Second scenario: If the Company has a hybrid mail environment, the connector has to be enabled in both directions! By default the port 25 has to be open for the mail communication. As an alternative you can also use port 587.
In the figure below, you can see how the Office365 connectors work in both scenarios.

Now you know how the connectors have to look like. Now, let’s configure them…
Office365 to on-premises:
MX record’s TTL
One thing you have to know is, that the very first thing you have to do is to set your publich DNS MX-record’s TTL down. By default the TTL for MX-records are set to 3600. That means the MX-records refreshes every hour. My recommendation is to set the TTL for the MX-records from 3600 to 300, one day before moving . This allows us to have less or no problems at all by changing the mail flow.
More information about MX-records you can find HERE.
Create a connector
After we have modified the TTL for the MX-records, we need to configure your Office 365 subscription. That means, we need to accept all mails on behalf of our organization. If we want to create a connector from O365 to our on-premise environment, we must create a send connector as smart host inside the on-premise environment.
To do so, start with the following:
- Go to EAC, navigate to mail flow > connectors. click the Add (+) icon to create a new connector.
- In the From: drop-down box, choose Office 365
- In the To: drop-down box, choose either your organization’s email server or partner organization if you want to connect to a server other than your organization’s.

Name the connector and add a description. If you want to turn on the connector immediately, check Turn it on. Click Next.

Choose Only when I have a transport rule… and click Next.

Specify one or more smart hosts to which Office 365 will deliver email messages.

Define your Transport Layer Security (TLS) settings depending on your security needs.

Review your new connector configuration and click Next to validate the connector.
Use the EAC to create a mail flow rule
Now that we’ve created a connector, we need to create a mail flow rule that will send mails to the connector based on the criteria you define. There are many conditions that you can select from to control when messages should be sent to the connector.
To create a mail flow rule start with following:
- In the EAC, navigate to mail flow > rules. Click the Add (+) icon and then choose Create a new rule…
- In the new rule window, name the rule. To see all the options available for the rule, click More options… at the bottom of the page.
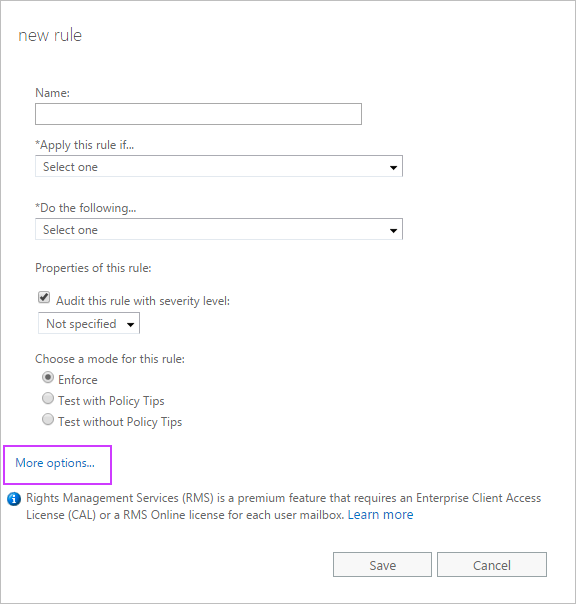
For *Apply this rule if…, select The recipient… and has specific properties including any of these words. Then the select user properties box appears. Click the Add(+) icon, and under User properties: and choose City. City is an Active Directory attribute made available for use by the transport rule. Specify the name of the city, such as New Orleans. Click OK, and then click OK again to close the select user properties box.

On-premise to Office 365:
Here Office 365 will accept all messages from the on-premise organization and send the messages in behalf of the the senders to the recipients in O365 and to external recipients (e.g. Gmail, Yahoo, other companies like Fabrikam, etc.) as well. For this scenario to work as expected, we will have to configure the Exchange servers to send all messages directly to Office 365.
The connector enables Office 365 to scan all mails for malware and SPAM.
As example we can see, which information is needed to configure the connector:
Name: Contoso on-prem to O365
FQDN: mail.contoso.com
SmartHost: contoso-com.mail.protection.outlook.com
Result
After completing the wizards for both connectors, you will find these created in Office 365 connectors as shown below.

Photo by oldskool photography on Unsplash