On the Ignite 2017 Steve Goodman held a very good session about 10 useful PowerShell commands, which are important to know as an Exchange admin. I am going to present you these 10 commands here, with a little explanation for each of it.
Some of the commands are more known that others, but I hope you will enjoy it and it will help you to operate your environment more smoothly…
The first command: GET-HELP
Ok, every one of us knows the get-help command. It is a simple one but still, very useful!
How does this command works?
Let’s take the following example:
You need to set up a new transport rule on your Exchange server. But you are not sure how to do that. So one way to be sure how to use the command right, is to get some examples. You can simply do this with the following command:
Get-Help New-TransportRule –Examples
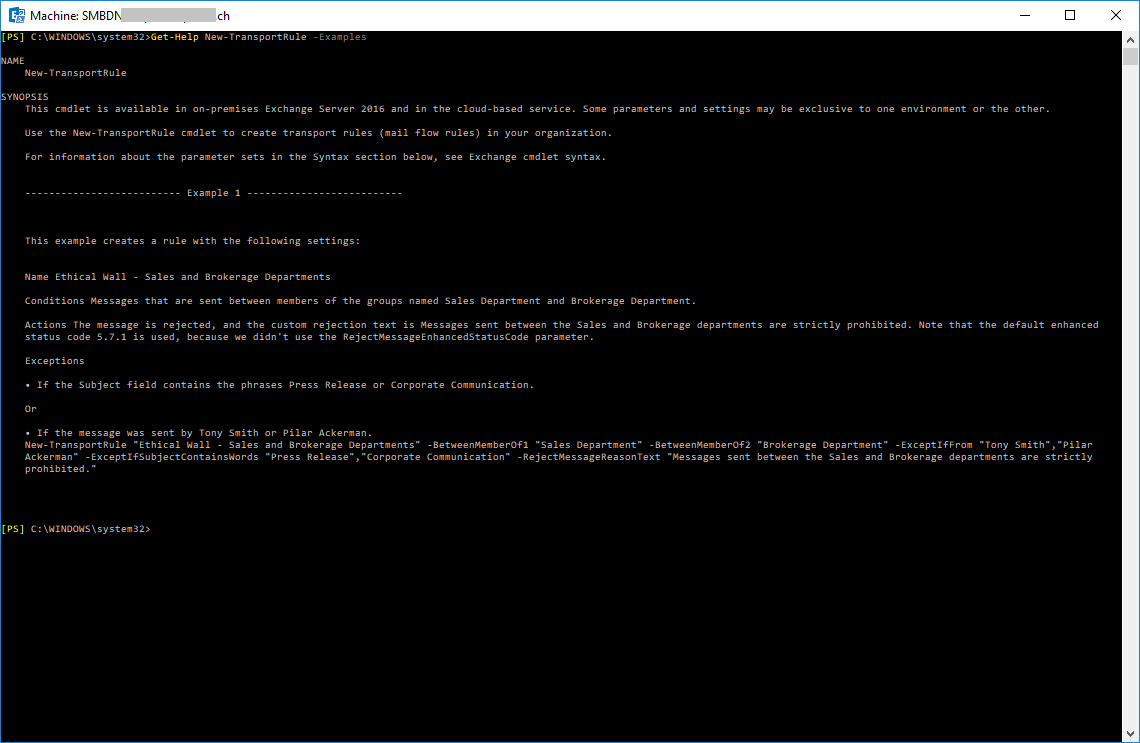
As we can see in the picture above, PowerShell shows us some examples for the New-TransportRule command.
But what if this is not enough? What if we need more information about the command? Like, what is needed and what is optional? And how to show this in a nice, comfortable view?
For this, we can use the parameter -Online:
Get-Help New-TransportRule –Online
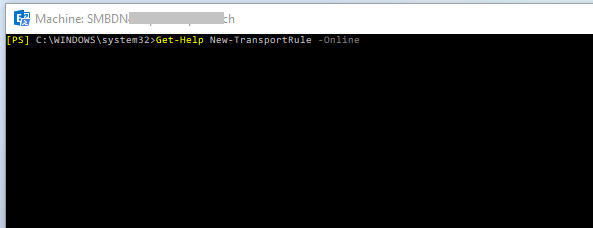
And here’s the result:
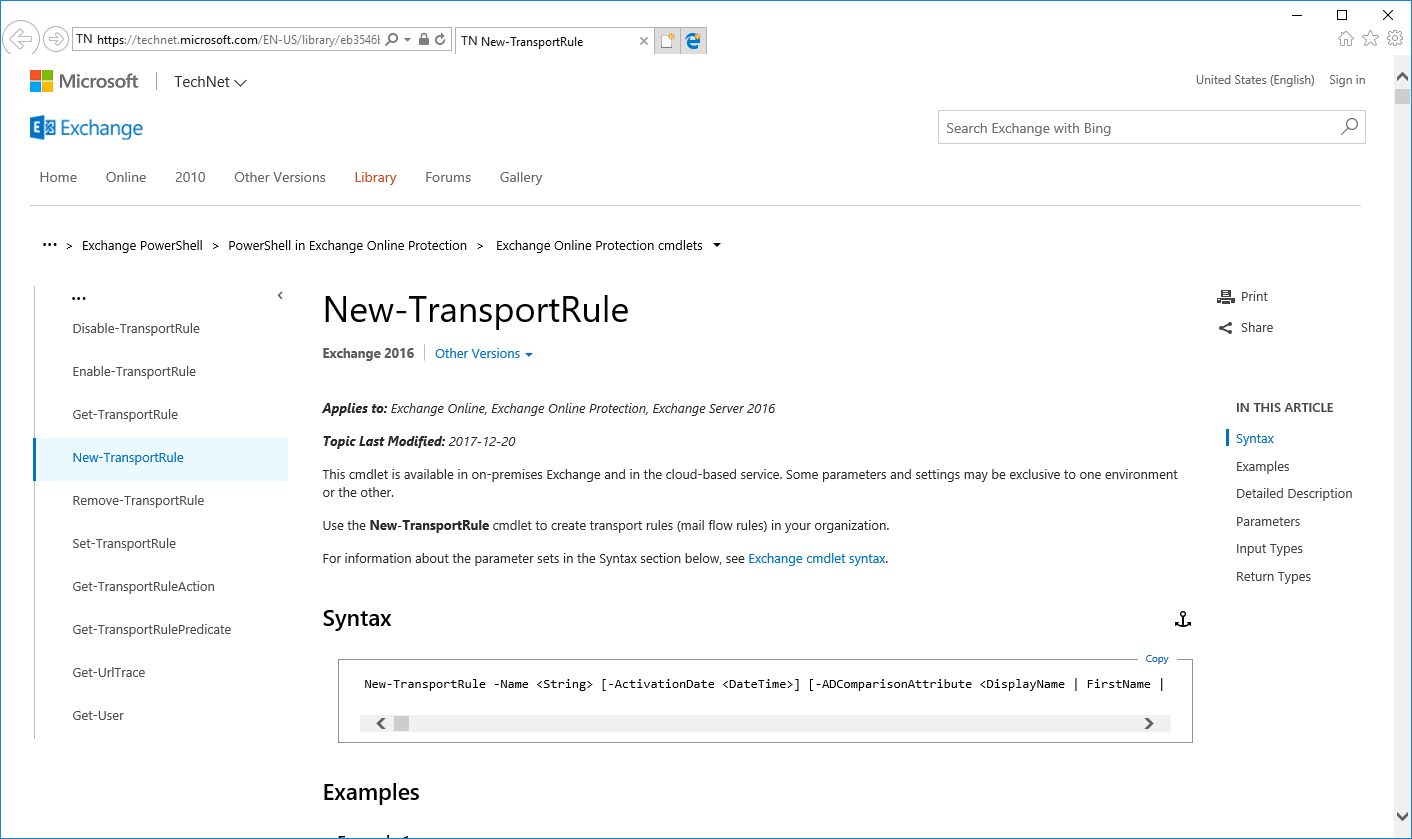
If you have an internet connection on the server you are running the Exchange management shell, it will open up a web browser and point directly to the corresponding Microsoft Technet article. This saves you time for searching and you´ll have all info you need about the New-TransportRule cmdlet.
So let’s get to our second command: GET-CONTENT
The Get-Content cmdlet allows you to examine your log files. You can also watch them in real-time!
As an example: Let’s have a look into the IIS log files. Our task is to check if some requests are coming through, or not. So I choose the current log file with the Get-Content command like:
Get-Content (file) -Tail 1 -Wait
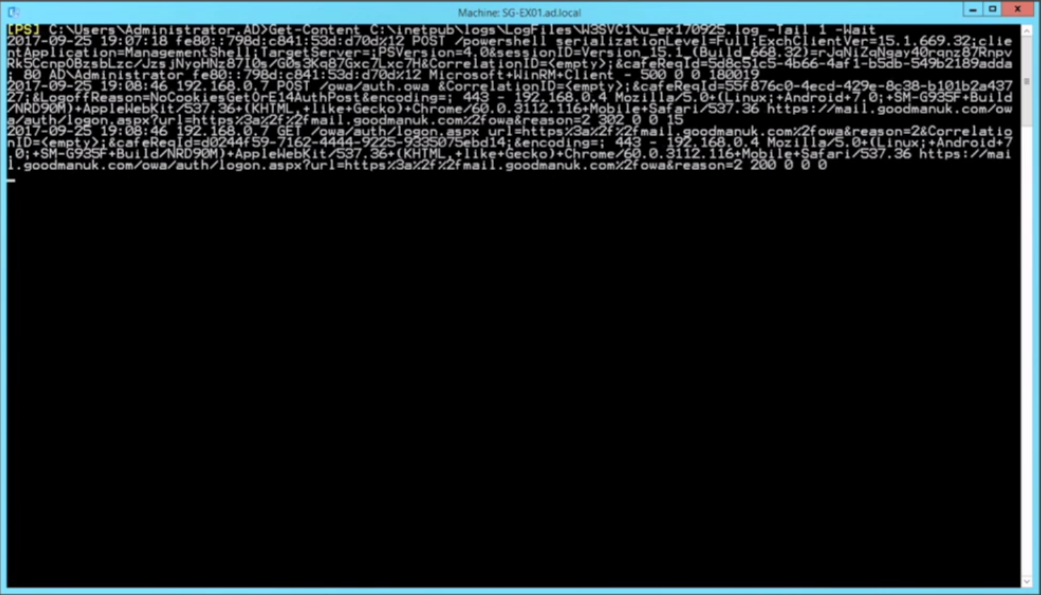
The –Wait parameter does the real-time thing. Every time new content is added to the file, the Get-Content cmdlet will ad-hoc show this content in the console. The optional part -Tail 1 is for showing only the last line (1) of the log file. Now, we see what is going on on the IIS in real-time.
If we store the Get-Content call into a variable, we’re also able to peak at the entries line by line. The content of the file then is stored as a string array through which you can navigate now by index number:
$File = Get-Content (file)
$File[1]

Get-Content is a fantastic troubleshooting tool you can use.
The next command I would like to present is SELECT-OBJECT
The Select-Object cmdlet is one of the core commands we need for working with PowerShell. Many engineers are using the command format list after the pipe and then start searching line by line for the needed info and then select it for further commands.
With the select-object command you can directly pick what you need and nothing else!
When you get data from one command, the Get-Mailbox as an example, just send it through the pipe. That means you can send it to the next command. The next command is select, (aka select-object) followed by the properties (comma separated) which we want to see. Those of you who already have some PowerShell experience may be familiar with it.
Here’s an example how to use the select-object command…
We run:
Get-Mailbox | Select DisplayName, SamAccountName, UserPrincipalName, PrimarySMTPAddress

So, we get all the info we need in form of a little report and thereby get only the information we have requested.
We can also use it in other ways as well.
We can use it to get a report of mailbox sizes of mailboxes in a specific database. We are going to get the display name and something that is not shown by default: I want to see the total item size.
Get-MailboxStatistics -Database (DM) | Select DisplayName, TotalItemSize
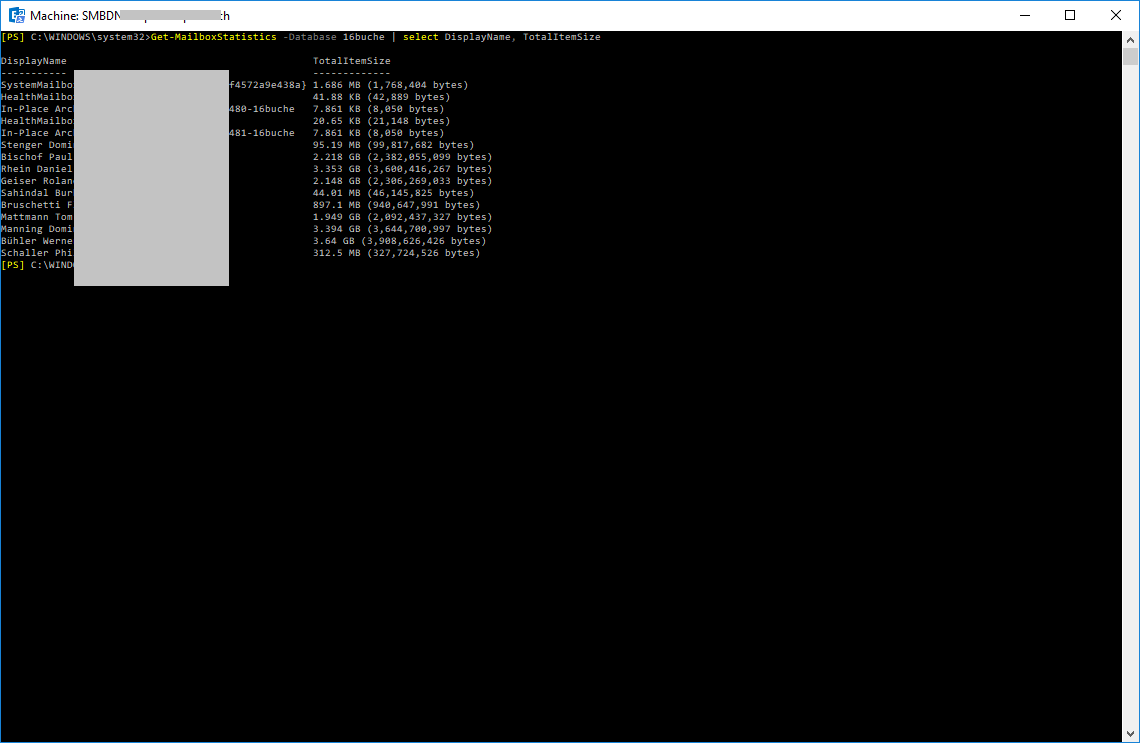
As you can see, we’ve built a very simple report over mailbox sizes in our Exchange environment.
The next PowerShell cmdlet we write about is : Start-Transcript
This cmdlet is perfect if you want to keep track on what you are doing, e.g when you are making changes to your environment.
If you are using Microsoft Exchange 2010, 2013 or 2016, you may have to actually capture what changes you have made, but that does not capture all the commands you typed in. Especially not the ones against Exchange. Perhaps you’re getting content from files to edit them first, before making changes.
You may be trying to create a script and you want to capture as you go along. Maybe doing the tests for your scripts by running parts of it in the shell first and then copy and paste it into notepad, or ISE.
Start-Transcript will allow us to record all that into a text file.
So let’s have a look at an example…
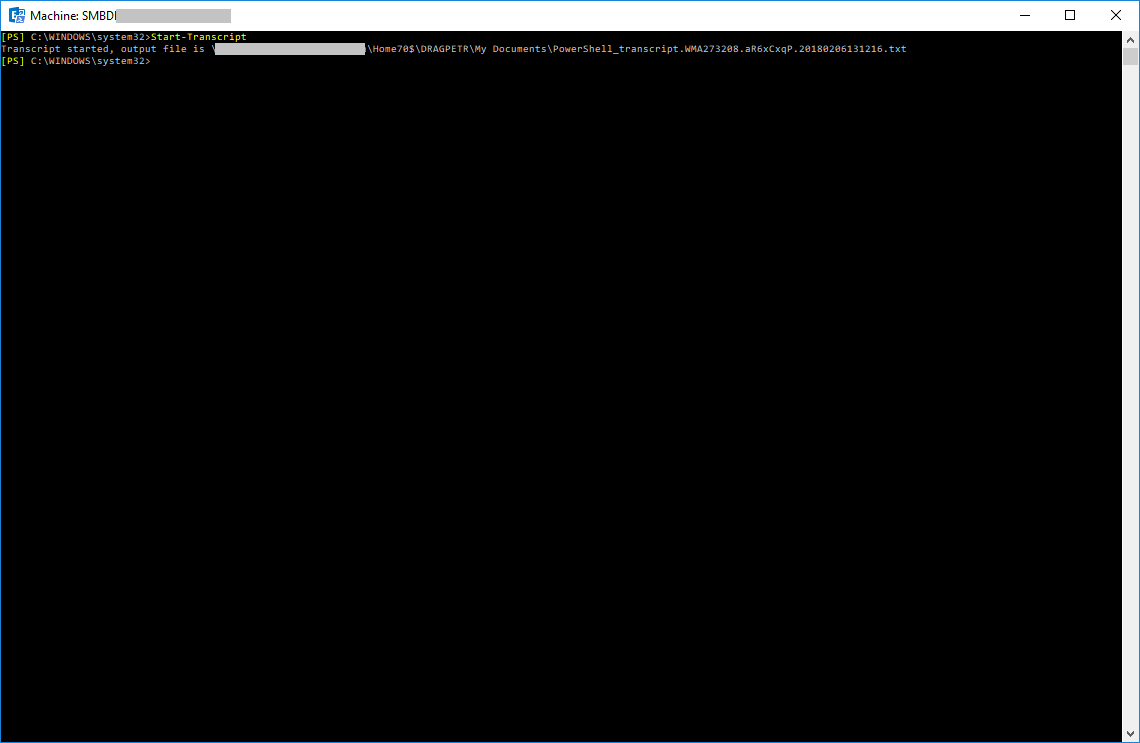
First, we need to start the transcript with:
Start-Transcript
Do all sorts of damage, but it’s OK because you had a change request approved… 😉
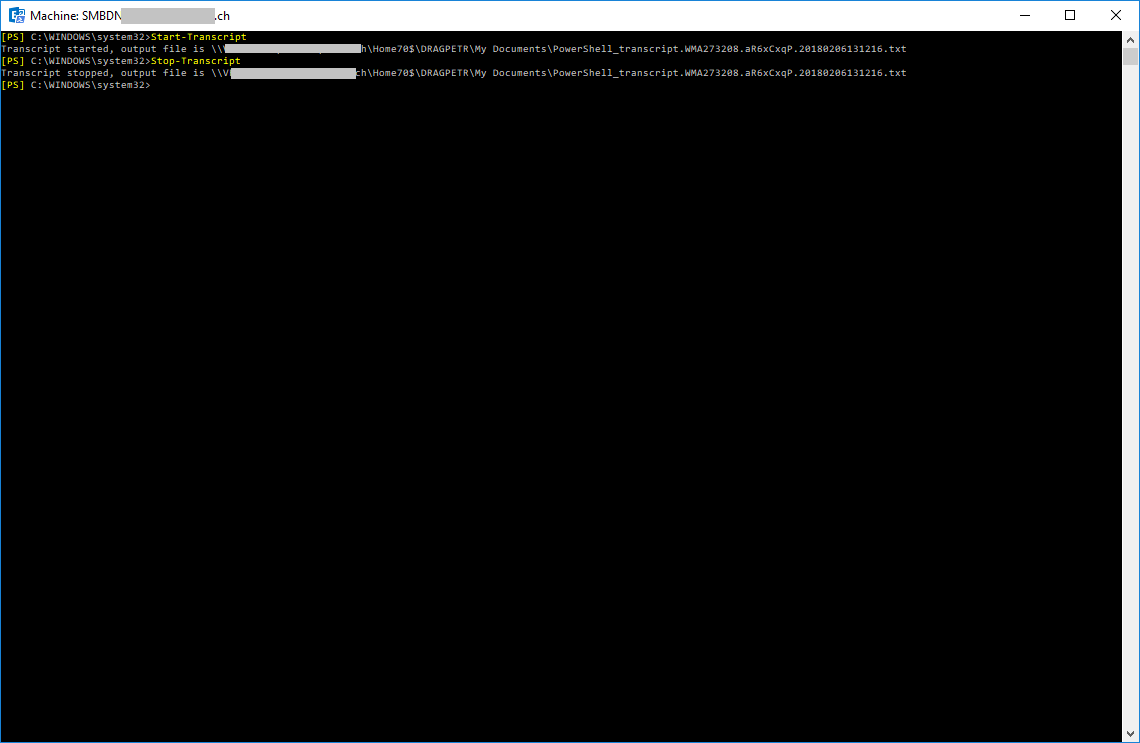
And, as you can see in the print screen, the path is provided, where the log file is saved to. Just run the following to stop recording.
Stop-Transcript
So if we need to check which changes we have done, we simply navigate to the log file and check our changes:
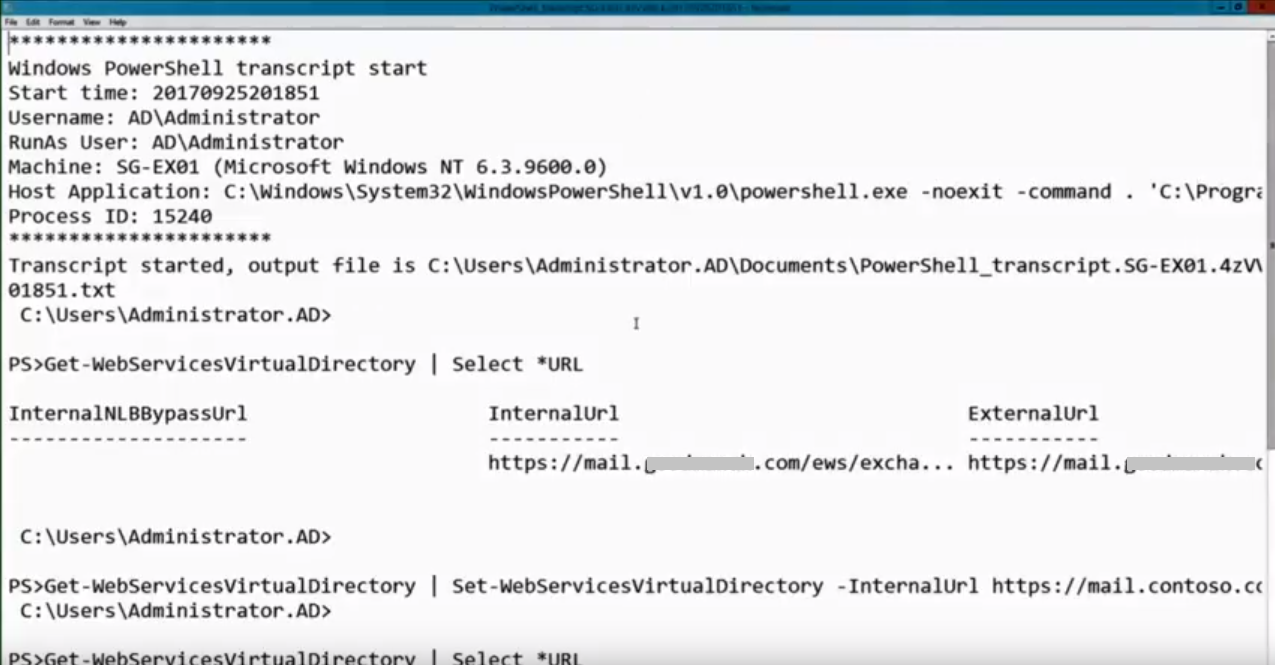
As you can see, it’s so much easier to check for mistakes, or wrong configurations with this, than to search through everything…
Now let’s continue with the Test-NetConnection command
With this command, we are for example able to check the connection to O365 in hybrid environments.
You can either run the tests through this cmdlet manually to check if the port is open from Exchange service to the Office 365 service. But you don’t need to do commands to prove the port is open. You can use it on a script base and then have actions executed, dependent on the result. You could, if you want to, run it across multiple services. So, it’s really easy to do.
Let’s see an example…
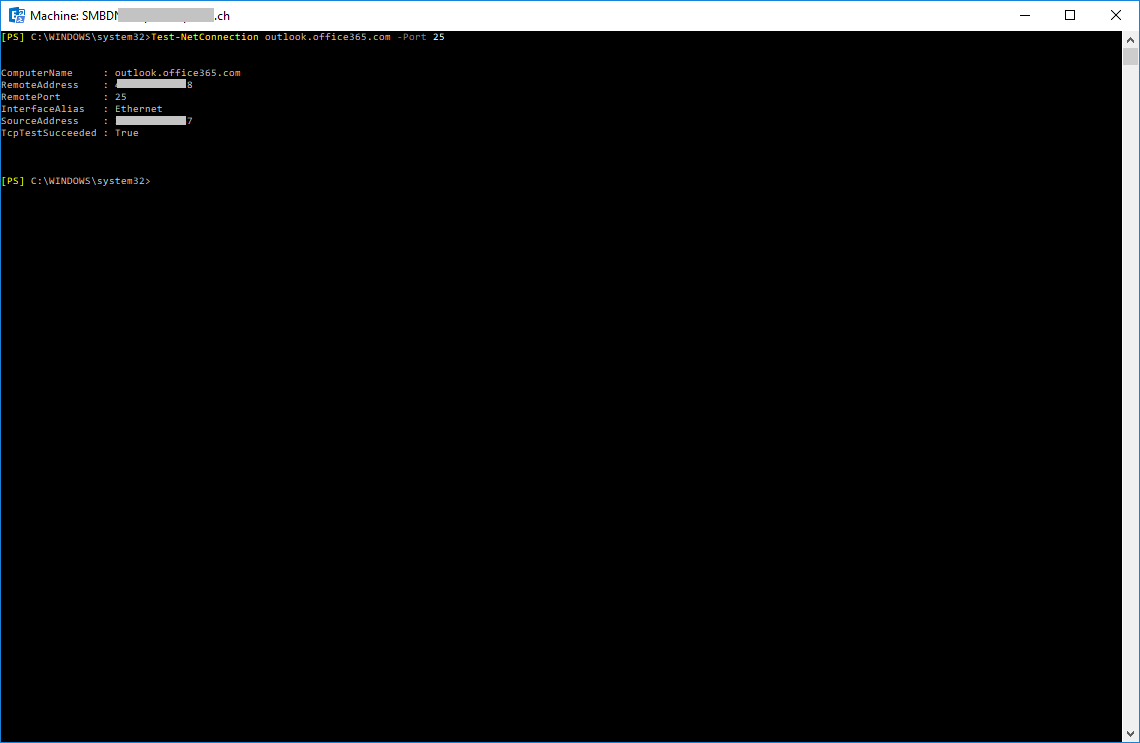
We run the following command:
Test-NetConnection outlook.office365.com -Port 25
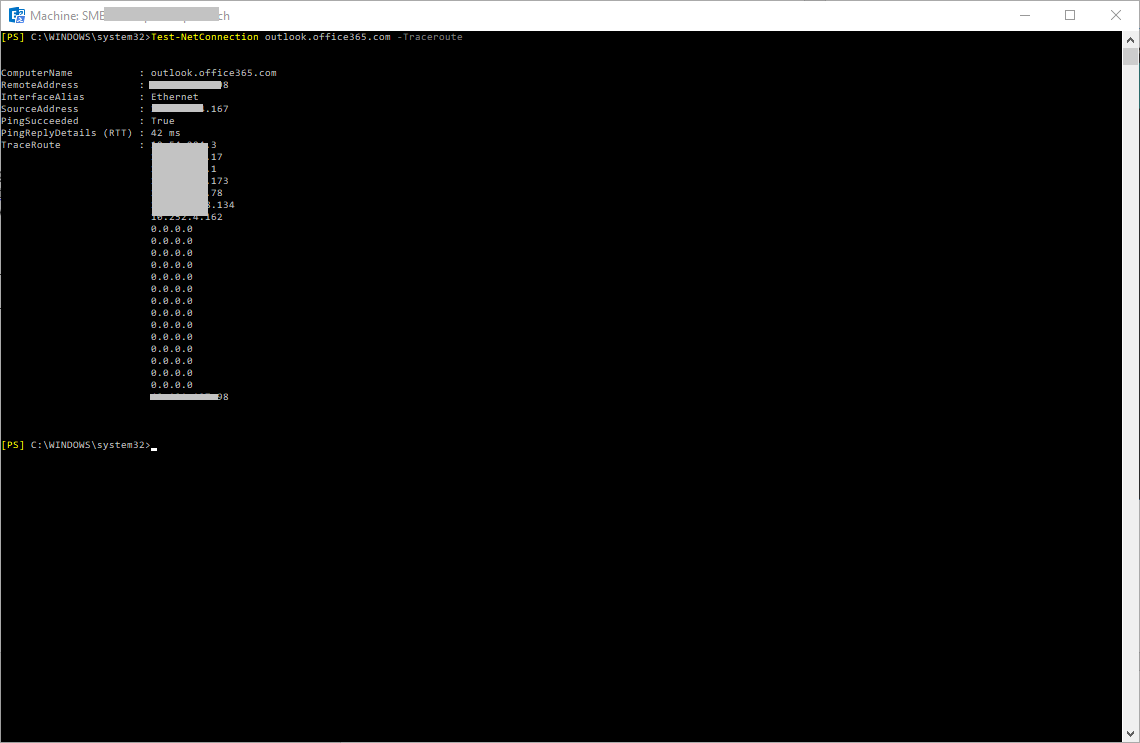
We can also check the mail flow of the Exchange server to O365.
Simply hit this into the shell:
Test-NetConnection outlook.office365.com -Traceroute
We can use this instead of the trace route (tracert)…
As you can see in the picture below, it can take some moments…

When the process is done, we get the following result:
With the output of this command, I can create some reports if needed. We can combine it with commands like select(-object) to use the data to create our own reports. We can put it into a word document or examine the words you see later in a different way. It’s a nice way of helping us, first of all, to do tests quickly. We can create scripts, which allow us to automate the tests against our environment on a regular basis and we can get information that we can bring into reports to find out significantly more information very quickly.
There are more great commands that go with this.
I hope you didn’t got bored yet, because here’s the next cmdlet: Export-CliXML
If we want to make sure we are having a solid record of everything we have done, this is our favorite command.
We are able to capture the entire output, even the stuff we don’t see, in its native PowerShell format into an xml file. We can take that file and use it on the same machine, put it on our notebook, use it to generate our reports and create scripts based on the information in the xml file.
It’s the output of the command, that we can use again and again to see what it looks like at that point in time.
Here, I’m going to run this command and I’m going to show you, how I can move the info between two computers.
Let’s run the following command:
Get-Mailbox -ResultSize Unlimited | Export-CliXML .\Mailboxes.XML
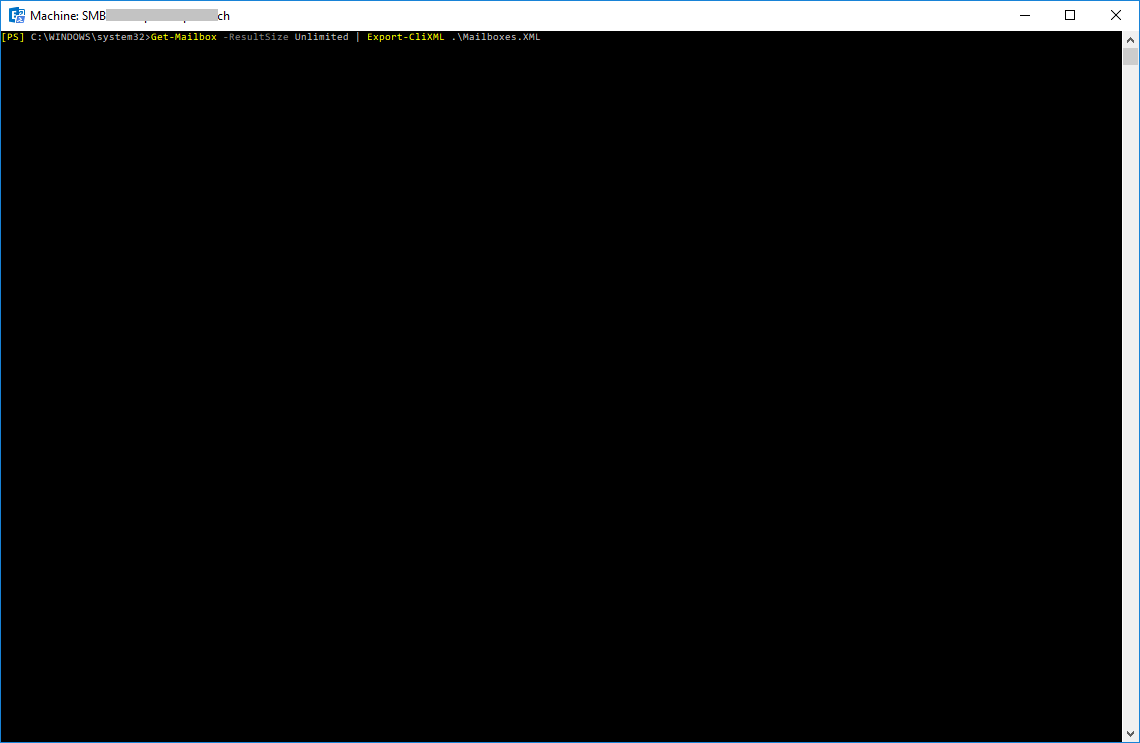
So, we have exported the CliXML.
Now, we’re going to move it to a different client:
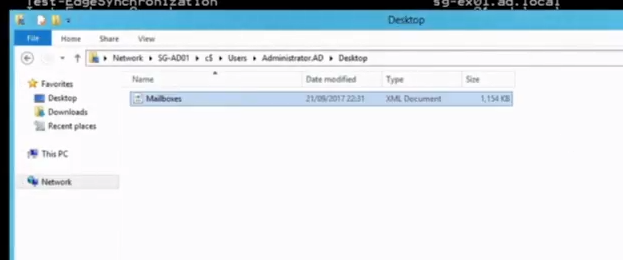
Then we jump to another server. This machine doesn’t have any Exchange management tools installed.
We are just opening with nothing else loaded then native PowerShell console! Now, we can use the following command to import the file:
Import-CliXML .\Mailboxes.XML
And as we see, it shows the exact content of what we got in the mailbox.
Let’s move on to the next command…
This time let’s talk about the Out-GridView cmdlet
If you don’t like to search your information across the command line output, we have the opportunity to use the grid view.
So, what does Out-GridView do? The Out-GridView cmdlet shows the output of a command in a separate window. This window has a user-friendly interface, where the output of command is displayed in a nice, sorted and ordered way. You can see here, that suddenly there’s a user interface showing the information, we’d usually see in the shell.
It is very simply to use it, lets do it with the following example:
Get-Mailbox | Out-GridView
The output of the Get-Mailbox cmdlet is piped to Out-GridView. Out-GridView then presents that output in form of a table inside a grid view control.
You can now add criteria for filtering, sort by columns and, by right clicking a column header, even add and/or remove columns.
If you pipe the output to the select cmdlet between the originating cmdlet and the Out-GridView cmdlet, you can also define all available properties of the piped object that will be available as columns.
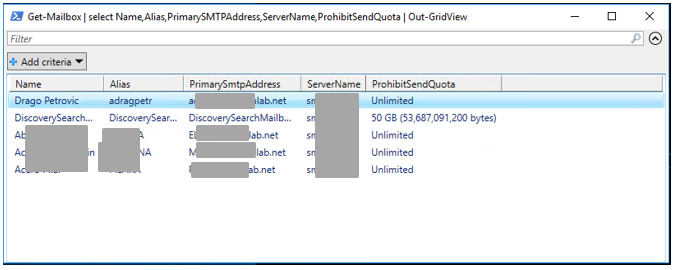
For example, if you also want to have the primary smtp address of the mailboxes shown in your grid view, just add that property to the select command, as follows:
Get-Mailbox | select Name,Alias,PrimarySMTPAddress,ServerName,ProhibitSendQuota | Out-GridView
The result would look like in the picture below.
Here are some simple examples, which commands work with Out-GridView:
Get-Mailbox | Out-GridView

Get-ExchangeServer | Out-GridView

Get-User | Out-GridView
Basically, you can send any PowerShell object to Out-GridView.
The Passthru parameter
A very cool parameter this cmdlet also has, is the -PassThru parameter.
If you execute Out-GridView with this parameter, you’ll first notice that OK and Cancel buttons are added to the grid view window. Objects, which you select in the grid view control, will now be passed into the pipe again, after you click the “OK” button. Now, you can use these objects for further processing by just piping from Out-GridView, again, to your next command. See following example.
Get-Process | Out-GridView -PassThru | Stop-Process
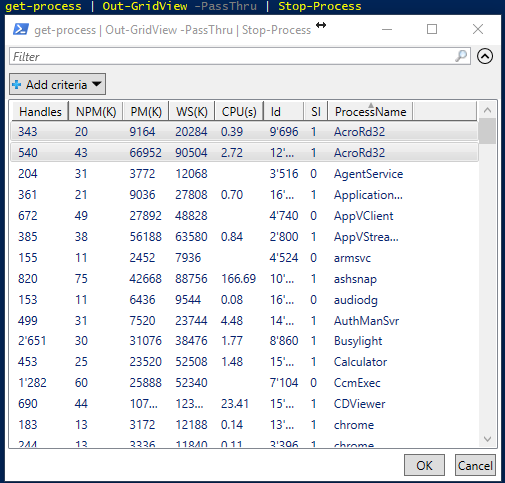
Here, I first selected the two Adobe Reader processes. After I hit the OK button, the objects of the selected processes are piped to the Stop-Process cmdlet and therefore will be stopped right away.
You can use this in combination with Exchange cmdlets, too. For example to execute any action on multiple mailboxes which you’ve selected in the grid view.
Soon we are coming to the end of this article. Only three left, but from my point of view, they are very important and highly recommended for scripting tasks.
The next I want to present you is: foreach.
When you use the Get-Content command and store the information into an array, then went through it line by line by line manually, what it allows you to do.
We can stick line-by-line through the input file or something like Get-Mailbox, and then we can perform the same check or test or action against each of those lines one-by-one.
It’s the foundation for the reporting scripts. We can go off of another command, against the output of the first command.
Let’s see a very simple example to grab the output from Get-Mailbox…
We run the following commands:
$Mailboxes = get-mailbox
Foreach ($Mailbox in $Mailboxes){get-user -Identity $Mialbox.userPrincipalName}
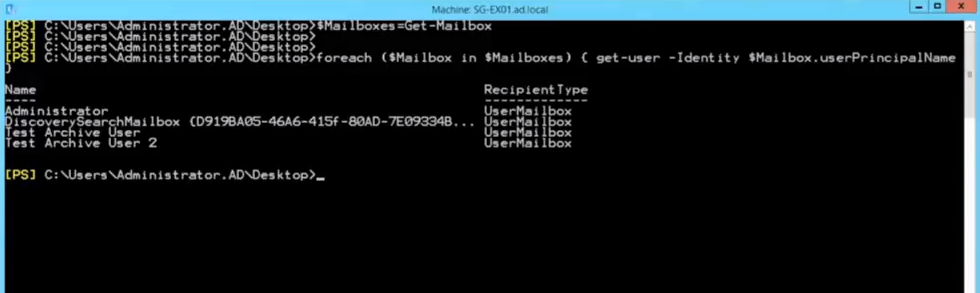
As you can see, it is very simple to use. We need something to put in for each. We have a list of mail boxes here. Then we pass that through and every single mailbox will have Get-User run against it. It’s at one time, and this could be a whole long list of commands in a script, and often it will not be just one line.
The second to last command I am writing about is: where
We can get the output and filter it. You are looking for something very specific. We could use it to find everybody who has a certain last name in the entire list of mailboxes in our organization or everybody with a job title of executive, and just grab that info.
What it does, what it relies on, get mailbox running, and get all the information to the PowerShell session, and if you have an environment with 20’000 or 70’000 people, that could take 15 minutes or longer to run.
In some circumstances, you should look at the command itself, and you can see if there’s a filter perimeter. That will allow you to trim back and filter out the data, very easily.
Here, where the filter command is not supported on many commands, or full of the properties it doesn’t support, it only supports the simple ones, and we can use it against any PowerShell command in Exchange and elsewhere to filter and find the specific information.
It’s very useful for gaining quick insight into our environment to find out the scale of problems perhaps.
Here an example: I need to check and find out people who have an email address policy disabled. This that I know here I have to make a manual update.
For that, we run the following command:
Get-Mailbox | Where {$_.EmailAddressPolicyEnabled -eq $False}
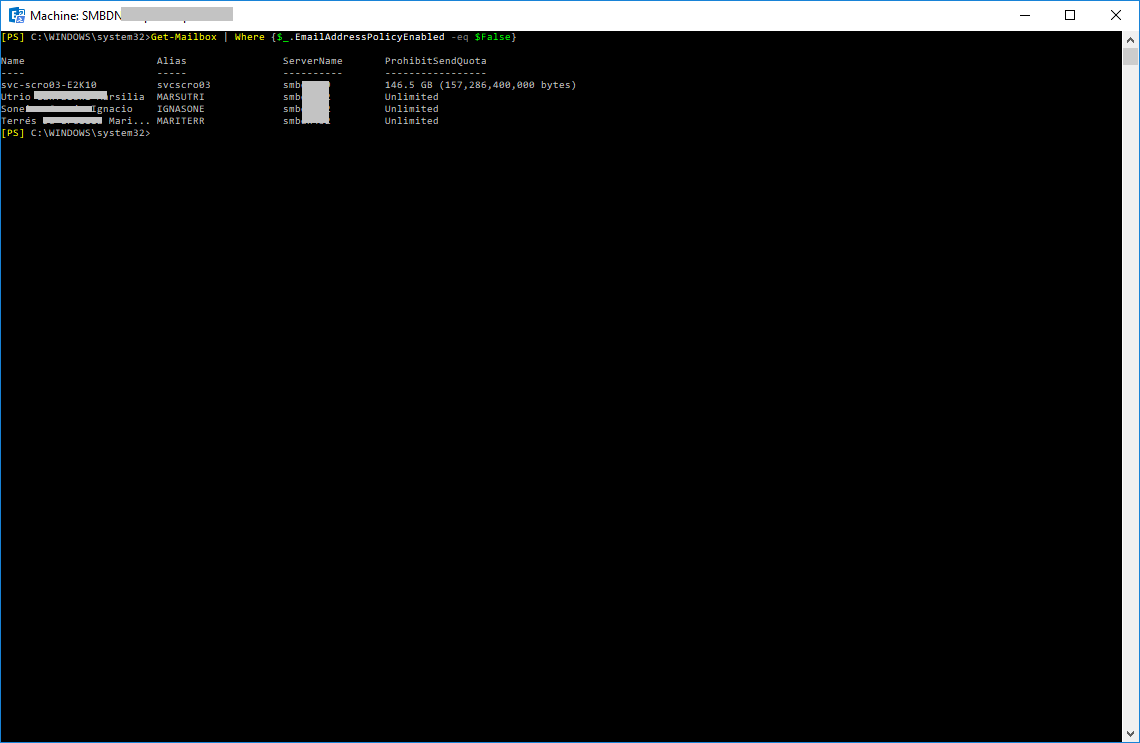
As you can see, we could use it to filter the output very easily from any of the Exchange PowerShell commands. It’s very easy to use.
Here some examples about how to use this commands:
Get-Mailbox | Where {$_.EmailAddressPolicyEnabled -eq $False}
Get-Mailbox -ResultSize Unlimited |where-object {$_.haspicture -eq $false} |select-object name,UserPrincipalName,haspicture | Export-Csv C:\TMP\UserWithoutPic.csv
So here the last one for this article…
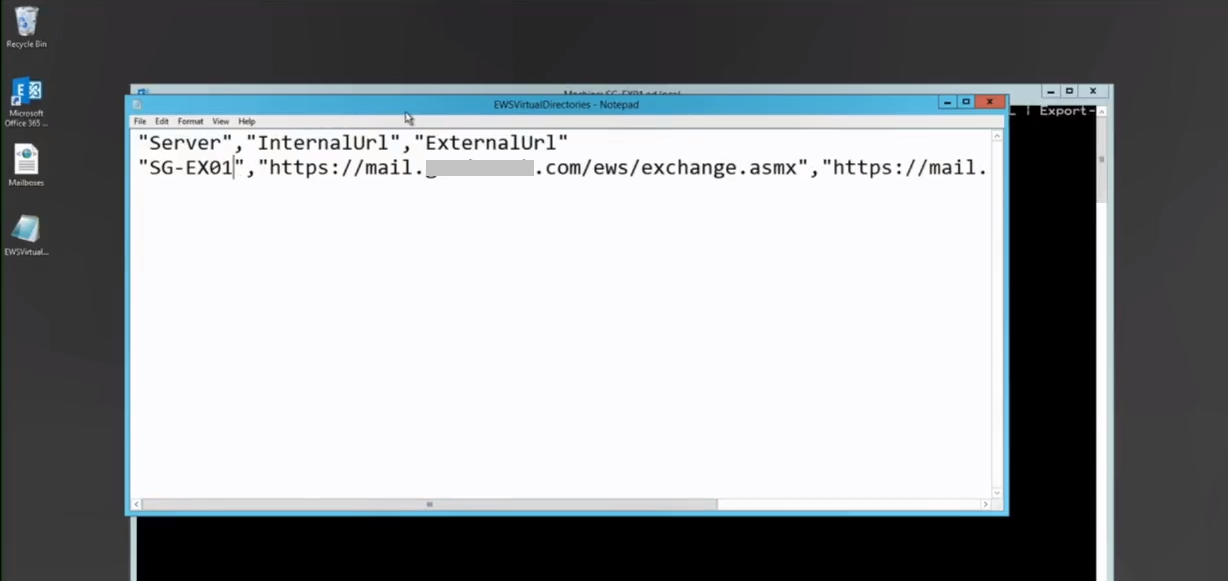
Let’s talk about Export-CSV:
This command is the foundation of all reports that has to be generated for a customer on a regular basis.
So if we want to create reports that shows sharing the organization and permissions and top ten mailbox sizes, this is the one, without a doubt!!
This command is being used hundreds of thousands of times in the scripts and commands. Without it, we couldn’t present information back to the business to help them make decisions about things like migrations or easily get infotmation into the documentation I correct.
We could, for example, do a report on a web services directories to see what needs to be changed.
We could go up to the server, and we will use the select, again, one of the foundation top 10 commands, and we will pipe that to export csv. Here we will use no type in the information to grab:
Get-WebServicesVirtualDirectory | Select Server, InternalURI, ExternalURI | Export-Csv -NoTypeInformation .\EWSVirtualDirectories.Csv
So, his are 10 of the most useful PowerShell cmdlets. As I wrote in the beginning, my motivation to write this article is, because of the Ignite session of Steve Goodman. If you would like to watch his session, I highly can recommend you this LINK. It will point you to his Ignite session.
Or you can just watch it here in our blog:
At this point, I want to say thank you personally to Steve for supporting me with this article!