Today, more and more companies are moving their IT environment to the cloud. One of the main services, which is moving to Office 365 is messaging.
Companies are mostly having their own Exchange environment on-premises, are using third party messaging systems (like Zimbra or UNIX solutions), or a Exchange solution hosted by a third company.
Here, I will not write about the reasons or sizes of the solutions. This article will show you, which ways we can use to migrate our company to Microsofts Exchange Online.
Note: I will show you four possible ways how to migrate. Of course there are more ways and scenarios how to move to O365 (Exchange Online) Cloud.
#1 – Migrate mailboxes from on-premises Exchange server
If we have an existing on-premises Exchange environment, we as an administrator are able to migrate all emails, calendars and contacts from user mailboxes to Exchange Online.
To do that, we have multiple ways we can go through:

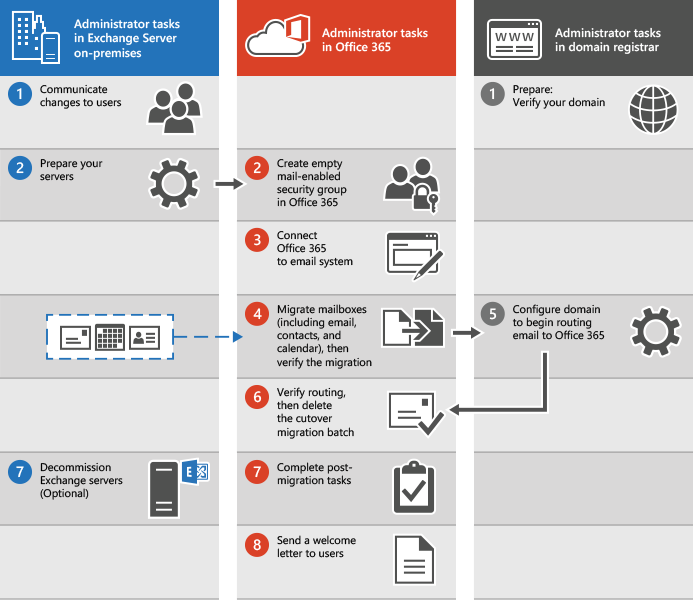
Cutover Migration:
If our company is still running Exchange 2003, Exchange 2007, Exchange 2010 or Exchange 2013 and if there are fewer than 2000 mailboxes, we can perform the cutover migration by using the Exchange Admin Center (EAC).
If we want to go this way, we need to make a careful planning before we begin.
One thing, that we have to keep in mind is, that the migration can take a few days. After that, we will be able to manage all user accounts from Office 365.
As mentioned earlier in this article, we are able to migrate a maximum of 2000 mailboxes by using a cutover migration. However, Microsoft recommends using this scenario for migrations up to 150 mailboxes, only!
Very important to know is that before we can start the migration, we need to add our primary SMTP domain as an accepted domain in our Office 365 Tenant. How to do that, you can find in my other article “Adding a Domain to Office 365 with PowerShell”.
After we have finished the migration to Office 365, each user who has an on-premises Exchange mailbox also will be a new user in Office 365. That means that we still will have to assign a license through the Office 365 portal to each user who was migrated.
To see how the cutover migration works, Microsoft provided the following picture:
Staged migration:
Another way we can use is the staged migration. If our company is running Exchange 2003 or Exchange 2007 and there are more than 2000 mailboxes, this could be a way to go. Important to know on this point is, that this scenario is not working with Exchange 2010, Exchange 2013 or Exchange 2016!
To be able to run this migration path, we also need to consider few points:
- First, we need to synchronize all accounts between Office 365 and our on-premises Active Directory.
- As for the cutover migration, we need to prepare our primary SMTP domain for Office 365, which means we have to create an accepted domain. How to do that, you can read HERE.
- We will only be able to migrate user mailboxes and resource mailboxes. Distribution groups, contacts, mail-enabled users or other recipient types will be migrated through directory synchronization to our Office 365 Tenant.
- Out of Office messages will not be migrated together with the user mailboxes. This means if a user turns on his Out of Office feature before the migration, it will be also enabled on Exchange online, but the Out of Office message will be empty. If we, as Exchange administrators have to set the Out of Office message, we can use the PowerShell command HERE.
To see how the staged migration works, Microsoft provided the following picture:

Hybrid:
If we are running Exchange 2010 (minimum SP3), Exchange 2013 or Exchange 2016, we are also able to create a hybrid environment. Important to know in this case is that Exchange 2010 will soon be out of support for this scenario.
Much more I don’t want to write here about this scenario. Ways, how we can configure a hybrid environment, I will describe in another article on this blog. However, I want to show you at least one way how it could look like:

Microsoft has created a deployment assistant on Technet as technical guidance. If you are interested in it, you can find it HERE.
#2 – Migrate PST files with the import service of Office 365.
If our organization has many large PST files, we can use the Office 365 import PST service to migrate email data to our Office 365 Tenant.

If we want to go this way, we need to use the right workflow for it. Important to know here is, that after creating the PST files, we have different ways to bring it to the cloud.
The official workflow of Microsoft shows us the following way:

Microsoft has written a fantastic article about using this scenario. I recommend you to read the official instructions about Office 365 import service.
#3 – Migrating email from a third party IMAP system:
If our company is running a third party IMAP environment like Gmail or others and we plan to migrate to Exchange Online, we can go with this scenario. If we have to migrate our user mailboxes by using IMAP migration, we are only able to migrate the items in the user inbox or other mail folders. The calendar items, contacts and tasks we will not be able to migrate with IMAP. Only the user will be able to do that in the end.
Important to know is, that migrating with IMAP will not create the mailbox in Office 365 by itself. That means, we have to create them manually before we start migrating.

If we talk about more facts of this migration path, we also need to know that there is a limit of maximum 500’000 items per mailbox. The migration progress is made in the way, that the newest emails will be migrated first and then it goes on to the oldest.
Another limitation we need to know is, that the maximum size of one email cannot be higher than 35 MB.
If we do an IMAP migration, we need access to the user mailboxes in our source email system. One way is to know the users password, or, depended on the third party product, we use the administrators credentials. Our users will not feel any impact until we turn of the source mail system, or we change the MX-Records.
Microsoft has published a workflow graphic with the steps we can follow for a successful IMAP migration:

Note: After the email migration is done, any new mail sent to the source email isn’t migrated. That is why we need to know, that we have to set the MX-Records at the right time!
#4 – Manual import by the user
Office 365 is designed in very user friendly way. That means we also have the option, that our users can migrate their mailboxes by them self.

Microsoft provides some guidelines how our users can do that. As an example, following the links to the scenario with Gmail:
For more information about other email accounts in Outlook and Outlook Web App, I can recommend you this link HERE.
Summary
Of course, there are more options then just these four I wrote about. We still have the opportunity to migrate with a certified partner, or by using third party software migration tools. Microsoft has a partner list online, where you can find the right company for you. To find one, you can follow the link below:
It doesn’t matter which way is the right one for you. Important is, that you plan the migration well and create your workflows and a game plan. Keep your users informed, update them when there is an update needed. Be patient with the users and explain them what features they will have after moving to the cloud and what has changed.