Last week I had to update a customers Exchange server envoriment with the new CU Pack.
It’s an Exchange 2016 environment, so I needed to install the CU8 from Microsoft.
If you want to know when, which Exchange version is released and you also need to know the build number, simply follow this Link to the Technet Library.
To find out how to check your current Exchange Server version, I can recommend you this article HERE that I posted on my blog.
So far about the prequels…
The Issue
After the installation I needed to reboot the updated Exchange server. To verify the installation after the reboot, I started the Exchange Management Shell and everything was looking fine. But after I started the ECP in the browser, I got the following error message:

Ok, that’s not cool at all..
So what to do? I started with checking the SysLog from the Server and (honestly) of course I was asking my favorite search engine (Bing, Google, Yandex,… it doesn’t matter which is your favorite).
After some investigation I found out that, after the CU update, the Exchange server had “lost” its authentication certificate. The solution in my case was to create a new one and provide it to the Exchange server.
The Solution
Here are the steps for the solution that helped me:
First we have to know which certificate is in use for the authentication config.
For that, simply run the following command:
Get-ExchangeCertificate (Get-AuthConfig).CurrentCertificateThumbprint
It will provide us the correct certificate with the thumbprint we will need for the upcoming steps.

In the next step we need to create a new authentication certificate. For this, we use the following command:
New-ExchangeCertificate –KeySize 2048 –PrivateKeyExportable $true –SubjectName ‘CN= Microsoft Exchange Server Auth Certificate’ –FriendlyName ‘Microsoft Exchange Server Auth Certificate’ –DomainName ‘contoso.com’

If you have questions about the New-ExchangeCertificate you can follow this link HERE. Or just run the following cmdlet on your PowerShell command line:
Get-Help New-ExchangeCertificate –Online
It will lead you to the corresponding Microsoft Technet article.
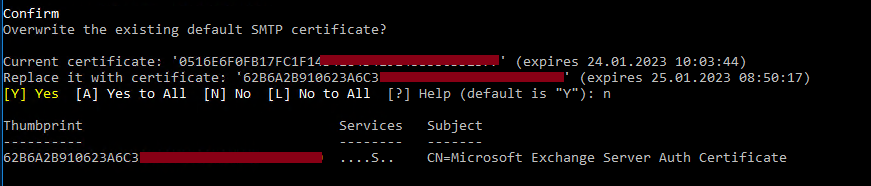
When the new certificate is created, PowerShell will ask you if you want to overwrite the default SMTP certificate. It will show you the thumbprint of the current certificate and the thumbprint of the new one.
IMPORTANT: we don’t want the default certificate for SMTP to be overwritten. So we answer the cmdlet question with n for NO.
Now, we need to clean the store from the previous certificate and publish the new one. This, we can simply do with the following two cmdlets:
Set-AuthConfig –ClearPreviousCertificate
and
Set-AuthConfig –PublishCertificate
![]()
As one of the last steps on the Exchange management shell, we just rerun the first command again to check if the right certificate is used, now. We run the command:
Get-ExchangeCertificate (Get-AuthConfig).CurrentCertificateThumbprint
And compare the both thumbprints.

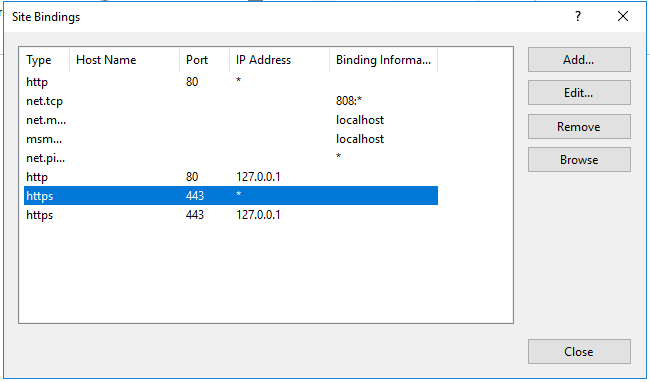
In the next step we have to start IIS Manager on the Exchange server. Here we navigate to:

In the binding we have to change the https type for the certificate entries. Simply mark one, click on Edit and select the right certificate.
After we are done with configuring the IIS settings, we’re going to restart the IIS.
We can do that by opening the command prompt with privileged rights and run the command:
iisreset

Note: While this task is a quick one, on the exchange server on which you run this command, the OWA will not be available while the IIS is restarting.
In my case, after all these tasks were done, I was able to connect to the ECP, again.
Even after entering my credentials, the login was working without any problems:
I hope, if you are having the same issue, this solution will help you, too.
In any case I wish you the best luck.