It look’s like I will start a series with this kind of articles. Thank you guys for your resonance and all of your feedback over the different channels…
Today, I will continue with some new commands for you. However, even this time it is the same mind set like in the previous articles 10 Usefull PowerShell cmdlets for Exchange and Another 10 useful PowerShell cmdlets some of the commands you may know and some are maybe new to you…
At the end of this article I will add some bonus content for you. I hope you will like it…
🙂
#1 – Get-ExchangeServerAccessLicense
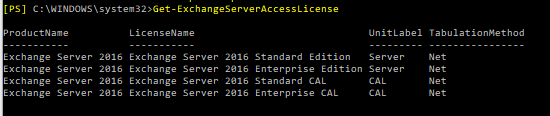
This command applies to Exchange server 2016 on-premises and returns a list of licenses in your Exchange organization.
If you run the following command:
Get-ExchangeServerAccessLicense
You will receive an output which will look like this:
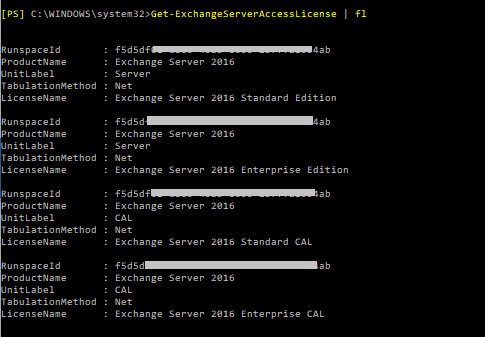
By piping it to the Format-List cmdlet, you also will be able to see UnitLabel and RunspaceID:
Get-ExchangeServerAccessLicense | fl
I guess you will not be using this command daily, but if you have to make an audit in a new customer’s Exchange environment, it shows you straight away, how many and which Exchange servers are in use.
#2 – Get-HealthReport
This command is also only available in on-premise Exchange environments.
On Microsoft Technet, there are many amazing scripts for reporting and/or health checks. However, sometimes these scripts are not needed, or you want to build a script on your own for health reporting for Exchange.
For that PowerShell has a simple command, which is called:
Get-HealthReport
Whith this command we are able to check a few things… As an example, if we run:
Get-HealthReport –Identity EXC-SRV01 –RollupGroup
We receive the following answer:
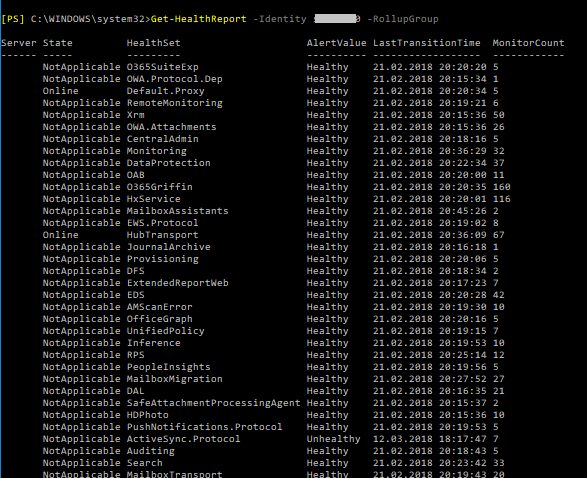
The list is even longer, but this is enough to understand for what we can use this command. It shows us the state of services and includes the transition time.
The following list contains the health values that are returned:
- Online
- Partially Online
- Offline
- Sidelined
- Functional
- Unavailable
In the Microsoft Technet article, you can also find the following parameters for this command:
| Parameter | Required | Type | Description |
| Identity | Required | Microsoft.Exchange.Configuration.Tasks.ServerIdParameter | The Identity parameter specifies the Exchange server that you want to view. You can use the following values to identify the server:
|
| GroupSize | Optional | System.Int32 | The GroupSize parameter determines the size of the group to process against for a rollup. The default value is 12. |
| HaImpactingOnly | Optional | System.Management.Automation.SwitchParameter | The HaImpactingOnly switch filters the results to only the monitors that have HaImpactingset to True. You don’t need to specify a value with this switch. |
| HealthSet | Optional | System.String | The HealthSet parameter filters the results by the specified health set. Monitors that are similar or are tied to a component’s architecture are grouped to form a health set. You can determine the collection of monitors (and associated probes and responders) in a given health set by using the Get-MonitoringItemIdentity cmdlet. |
| MinimumOnlinePercent | Optional | System.Int32 | The MinimumOnlinePercent parameter specifies the number of members in the group to be functioning with rollup information Degraded instead of Unhealthy. The default value is 70 percent. |
| RollupGroup | Optional | System.Management.Automation.SwitchParameter | The RollupGroupswitch specifies that the health data is rolled up across servers with redundancy limits. You don’t need to specify a value with this switch. |
#3 – Connect-MsolService
As the name says, this command belongs to Azure AD and Office 365.
The Connect-MsolService cmdlet attempts to initiate a connection to Azure Active Directory. You must specify a credential, as a PSCredential object, or specify the CurrentCredentials parameter to use the credentials of the current user.
This command can be used with different optional parameters.
As example if you use simply the command like this:
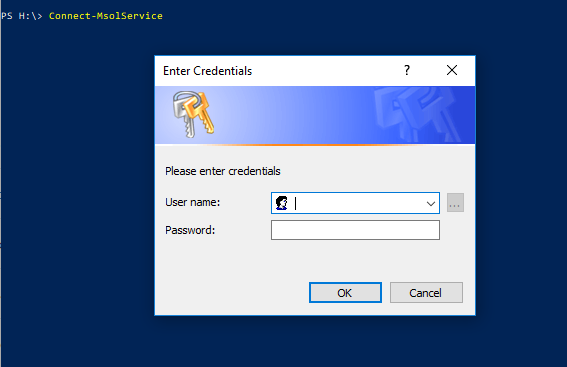
Connect-MsolService
This command attempts to initiate a connection with Azure Active Directory. Since no credential is provided, the cmdlet prompts you to enter your username and password.
If you are using the command like this example:
Connect-MsolService -Credential $Credential -AzureEnvironment AzureChinaCloud
It will attempts to initiate a connection to AzureChinaCloud with Azure Active Directory using the credential provided. The credential must be of the type PSCredential. To obtain a credential object, use the Get-Credential cmdlet.
Below you can see a list of optional parameters, which you can use for the Connect-Msol cmdlet:
-AdGraphAccessToken # Specifies the AD Graph access token to use to connect to Azure Active Directory.
-AzureEnvironment # Specifies the deployment type to use to connect to Azure Active Directory in different region.
-Credential # Specifies the credential to use to connect to Azure Active Directory.
-MsGraphAccessToken # Specifies the MS Graph access token to use to connect to Azure Active Directory
#4 – Get-MsolDomain
This command is also, like the previous one, usable for the Azure AD. After you have successfully logged in to your subscription with the Connect-MsolService, you can use the Get-MsolDomain cmdlet.
If you run just the basic command:
Get-MsolDomain
It will list you all domains, which are added to your tenant/subscription. You will be able to see the domain name, status and authentication type.
Of course, you also have some optional parameters you can run it with:
Get-MsolDomain [-Status] [-Authentication ] [-Capability ] [-TenantId ] [ ]
How this could help us? Well, if you have to make an audit or you have to administrate a company tenant with multiple domains and you need to figure out which domains are verified, you can run this command:
Get-MsolDomain –Status Verified
Here are some more optional parameters for this command:
-Capability # Specifies the filter for domains that have the specified capability assigned.
-Status # Specifies the filter to return only domains with the specified status. Valid values are: Verified, Unverified, and PendingDeletion.
-TenantId # Specifies the unique ID of the tenant on which to perform the operation. The default value is the tenant of the current user. This parameter applies only to partner users.
#5 – Get-FederationTrust
Finally a command, which we can use for Exchange online and Exchange on-premise (2016). However, some parameters and settings may be exclusive to one environment or the other.
Creating federations between Exchange organizations today is already state of the art. With a federation we are able to, for example, see the free/busy information between organizations and other things. If you want to know more about federation between Exchange, I can recommend you the LINK HERE to the right Technet article.
However, today we want to know more about the specific command to check how it looks like with federation trusts.
The first command we can run is this one:
Get-FederationTrust | Format-List
Running this command we will receive a lot of information’s about all trusts we have in our organization.
A similar command we also can use to get more information’s is the Get-FederationInformation command. Use the Get-FederationInformation cmdlet to get federation information, including federated domain names and target URLs, from an external Exchange organization.
As example if we enter the following command:
Get-FederationInformation -DomainName contoso.com
We will get a bulk of information like:
RunspaceId
TargetApplicationUri
DomainNames
TargetAutodiscoverEpr
TokenIssuerUris
Identity
IsValid
ObjectState
The Get-FederationInformation cmdlet retrieves federation information from the domain specified. Results from the cmdlet can be piped to the New-OrganizationRelationship cmdlet to establish an organization relationship with the Exchange organization being queried.
#6 – Redirect-Message
Use the Redirect-Message cmdlet to drain the active messages from all the delivery queues on a mailbox server, and transfer those messages to another mailbox server. This cmdlet is available only in on-premises Exchange.
That means, if the queue on one server is higher than on another one, we can redirect messages to the other server. That makes sure, that we do not run into troubles. The command for this example can be:
Redirect-Message -Server Mailbox01 -Target Mailbox02
When a message queue is drained, the active messages in the queues on the source mailbox server are routed to the target mailbox server. After the messages are received and queued by the target mailbox server, the messages are made redundant.
#7 – Get-HybridMailflow
Lets jump to a command, which is available only on Exchange online…
The Get-HybridMailflow cmdlet is used to view the configuration of message transport settings for hybrid deployments that were created with the Hybrid Configuration wizard.
So if we run the command:
Get-HybridMailflow
We will receive informations about:
RunspaceId
OutboundDomains
InboundIPs
OnPremisesFQDN
CertificateSubject
SecureMailEnabled
CentralizedTransportEnabled
Identity
IsValid
ObjectState
This information helps us if we need to configure new message transport settings in the EOP service for a hybrid deployment. For that we simply change the “Get” verb to:
Set-HybridMailflow
For this commands we have a bulk of parameters which you can see below:
| Parameter | Required | Type | Description |
| CentralizedTransportEnabled | Optional | System.Boolean | The CentralizedTransportEnabled parameter specifies that the Exchange Online organization routes all outbound mail messages to external recipients to the on-premises Exchange organization. The on-premises Exchange organization then routes the messages to the external recipients. The valid input for the CentralizedTransportEnabled parameter is $true or $false. The default value is $true. |
| CertificateSubject | Optional | System.String | The CertificateSubject parameter specifies the principal name of the certificate used for secure mail flow between the on-premises Exchange and Exchange Online organizations. |
| Confirm | Optional | System.Management.Automation.SwitchParameter | The Confirm switch specifies whether to show or hide the confirmation prompt. How this switch affects the cmdlet depends on if the cmdlet requires confirmation before proceeding.
|
| InboundIPs | Optional | Microsoft.Exchange.Data.IPRange[] | The InboundIPs parameter specifies the IP addresses of the on-premises mail transport servers configured as part of the hybrid deployment. These must point to either Exchange 2010 SP2 Hub Transport or Edge Transport servers. |
| OnPremisesFQDN | Optional | Microsoft.Exchange.Data.Fqdn | The OnPremisesFQDN parameter specifies the fully qualified domain name (FQDN) of the outbound smart host in the on-premises Exchange organization to use for centralized transport. This is either an on-premises Exchange 2010 SP2 Hub Transport or Edge Transport server. |
| OutboundDomains | Optional | Microsoft.Exchange.Data.SmtpDomainWithSubdomains[] | The OutboundDomains parameter specifies SMTP domains configured for the hybrid deployment. |
| SecureMailEnabled | Optional | System.Boolean | The SecureMailEnabled parameter specifies that all messages sent between the on-premises Exchange and the Exchange Online organizations must use the Transport Layer Security (TLS) protocol and the assigned digital certificate. The valid input for the SecureMailEnabledparameter is $true or $false. The default value is $true. |
| WhatIf | Optional | System.Management.Automation.SwitchParameter | The WhatIf switch simulates the actions of the command. You can use this switch to view the changes that would occur without actually applying those changes. You don’t need to specify a value with this switch. |
#8 – Get-SmimeConfig
This command applies to Exchange Online and Exchange Server 2016.
If you want to know more about what S/MIME is, or for what we can use it, I can recommend you the following LINK HERE.
Here, I want to do a short introducion of the Get-SmimeConfig cmdlet.
By running the command without any additional parameter like:
Get-SmimeConfig
We will be able, to see all current settings for S/MIME at the OWA. This can help us to, e.g. set the S/MIME configuration to allow users the choice of signing messages, limit the Certificate Revocation List (CRL) retrieval time-out to 10 seconds, and specify the 128 bit RC2 encryption algorithm.
Sounds complicated? Here’s the command for this example:
Set-SmimeConfig -OWAAllowUserChoiceOfSigningCertificate $true -OWACRLRetrievalTimeout 10000 -OWAEncryptionAlgorithms 6602:128
Warning: The Set-SmimeConfig cmdlet can change several important parameters than can reduce the overall level of message security. Review your organization’s security policy before you make any changes.
You need to be assigned permissions before you can run this cmdlet. Although this topic lists all parameters for the cmdlet, you may not have access to some parameters if they’re not included in the permissions assigned to you.
#9 – Get-PhishFilterPolicy
This more specific command applies to Exchange Online and Exchange Online Protection (EOP)
If you need to define new phishing policies with the command:
Set-PhishFilterPolicy
It helps to see the current configuration.
To do that you can set tree types of parameters:
- Detailed (Required) The Detailed switch specifies whether to return detailed information in the results. You don’t need to specify a value with this switch.
- SpoofAllowBlockList (Required) The SpoofAllowBlockList switch specifies whether to return a summary view of detected spoof activity. You don’t need to specify a value with this switch.
- SpoofType (Optional) The SpoofType parameter filters the results by the type of spoofing. Valid values are: Internal or External
So, if we want to get a detailed list of senders that appear to be sending spoofed emails to our organization, we can run this command:
Get-PhishFilterPolicy-Detailed -SpoofAllowBlockList -SpoofType Internal
The Get-PhishFilterPolicy with the SpoofAllowBlockList switch returns the following information:
- Sender/sender domain: The true sending domain that's found in the DNS record of the source messaging server. If no domain is found, the source messaging server's IP address is shown.
- SpoofedUser: The sending email address if the domain is one of your organization's domains, or the sending domain if the domain is external.
- MailVolume: The number of messages.
- UserComplaints: The number of user complaints.
- Authentication: Indicates whether the message has passed any type of authentication (explicit or implicit).
- Last seen: The date when the sending email address or domain was last seen by Office 365.
- Decision set by: Specifies whether Office 365 set the spoofing policy as allowed or not allowed to spoof, or if it was set by an admin.
- AllowedToSpoof: The three possible values are Yes (messages that contain any spoofed sender email addresses in your organization are allowed from the source messaging server), No (messages that contain any spoofed sender email addresses in your organization are not allowed from the source messaging server), and Partial (messages that contain some spoofed sender email addresses in your organization are allowed from the source messaging server.
- Spoof Type: Indicates whether the domain is internal to your organization or external.
By having all information we need, we can, for example configure the phish filter policy to block or allow all spoofed email messages from a source messaging server:
Step 1: Write the summary output of the Get-PhishFilterPolicy cmdlet to a CSV file.
Get-PhishFilterPolicy -Identity Default -SpoofAllowBlockList | Export-CSV "C:\My Documents\Summary Spoofed Senders.csv"
Step 2: Add or modify the TrueSender, and AllowedToSpoof values in the CSV file, save the file, and then read the file and store it in a variable named $UpdateSummarySpoofedSenders.
$UpdateSummarySpoofedSenders = Get-Content -Raw "C:\My Documents\Summary Spoofed Senders.csv"
Step 3: Use the $UpdateSummarySpoofedSenders variable to configure the phish filter policy.
Set-PhishFilterPolicy -Identity Default -SpoofAllowBlockList $UpdateSummarySpoofedSenders
#10 – Get-SpoofMailReport
Spoofing has long been one of the biggest issues with email and with the move to cloud services in the last few years it has become an ever hotter topic. That’s why the last command for this article applies only to the cloud-based services (Exchange Online and EOP).
Use the Get-SpoofMailReport cmdlet to view information about insider spoofing in your cloud-based organization. Insider spoofing is where the sender’s email address in an inbound message appears to represent your organization, but the actual identity of the sender is different.
To get a report about the insider spoofing detections in our organization during the month February 2018, we can use this command:
Get-SpoofMailReport -StartDate 02/01/2018 -EndDate 02/28/2018
The spoof mail report is a feature in Advanced Threat Protection that you can use to query information about insider spoofing detection in the last 30 days. For the reporting period, which you specify, the Get-SpoofMailReport cmdlet returns the following information:
- Date Date the message was sent.
- Event Type Typically, this value is SpoofMail.
- Direction This value is Inbound.
- Domain The sender domain. This corresponds to one of your organization’s accepted domains.
- Action Typically, this value is GoodMail or CaughtAsSpam.
- Spoofed Sender The spoofed email address or domain in your organization from which the messages appear to be coming.
- True Sender The organizational domain of the PTR record, or pointer record, of the sending IP address, also known as the reverse DNS address. If the sending IP address does not have a PTR record, this field will be blank and the Sender IP column will be filled in. Both columns will not be filled in at the same time.
- Sender IP The IP address or address range of the source messaging server. If the sending IP address does have a PTR record, this field will be blank and the True Sender column will be filled in. Both columns will not be filled in at the same time.
- Count The number of spoofed messages that were sent to your organization from the source messaging server during the specified time period.
### BONUS ###
Insert time stamps into PowerShell outputs
For your PowerShell tasks, you can have a time stamp in a series of commands, so you can determine how long a single step occurs, or to use it as a logging mechanism for your scripts.
To insert a time stamp, enter one of the following commands as a single line into your .ps1 file:
Command Output example
"$(Get-Date -format g) Start logging"                      2/5/2008 9:15 PM Start logging

"$(Get-Date -format F) Start logging"                      Tuesday, February 05, 2008 9:15:13 PM Start logging

"$(Get-Date -format o) Start logging"                      2008-02-05T21:15:13.0368750-05:00 Start logging

"$(get-date -format yyyyMMdd-HHmmss) Start logging"        20180329-164314 Start logging
There are many other formats for the Get-Date command, but these four options would generally suite most applications for time stamp purposes.