Prolog
Recently, I have been getting inquiries from customers, who have the following scenario:
The environment was originally an on-premises infrastructure. Then the customers have decided to switch to Office 365 and implemented this step as follow:
The AAD was configured to sync the user accounts to the cloud, but without the Exchange attributes. The user accounts synced to the cloud where then assigned an Office 365 E3 (or E5) license.
However, since Azure AD did not see any Exchange attributes, online mailboxes were created for the User Exchange.
That means that all users now have a new empty mailbox, which they use after the cutover.
Then the mail content was migrated with a third-party tool from the “old” on-premise mailbox to the “new” Exchange online mailbox.
The mail relaying for on-premise applications or hardware was made with an IIS SMTP service or the Exchange online was directly connected.
Problem
These configurations basically work well, modifications like mailbox permissions on the mailboxes can be made directly on Exchange online. However, if you need to make a modification to the SMTP address, you have to do this in the Local Active Directory and then sync the change via the AAD.
It can lead to problems that when entering smtp addresses in the Active directory, this can not be easily followed if it is already in use.
Another drawback is that there is no longer a local exchange server that can do the relaying for the on-premise applications that are not able to communicate directly with the cloud.
Therefore, third party tools are used for this standard function, which have to be managed separately.
Solution – the long way
The customers, who have approached me, now want to have a standardized and Microsoft supported state again. Not least because Microsoft does not charge any Exchange license fees for an Exchange 2016 server if it is used as a hybrid only server. (This only works with Exchange 2016, Exchange 2019 does not have this license option. What must be taken into account is that the Windows Server license must be present)
To restore this state, the following points must be performed:
– The Exchange Recipient Display Type must be adjusted per mailbox
– The Exchange Recipient Type Details per mailbox must be adjusted
– The Exchange mailbox type must be adjusted
– The Exchange GUID must be merged
– The routing address per mailbox must be adjusted
– (Recommended) Adjusting the UPN to firstname.surname
– The Exchange HCW must be executed
Afterwards, the AAD connect must be reconfigured and then the infrastructure is in a standardised state again.
Solution – the easy way
So that this can be done faster and in a standardized way, I have written a script that does these tasks for me. The script can be downloaded in the Technet Gallery and is available for free.
I will talk about the script handling later in this article.
But before you use it, I recommend to read the next chapter.
Pre Tasks
Before we start with the transformation and unification of the mailboxes, it should be noted that we are making one or two preparations in our on-premise Active Directory.
If your company uses Outlook from the Office 365 package, the following settings are not mandatory, but recommended:
Modify the internal DNS Record for Autodiscover
In hybrid mode, your SMTP domain of course “belongs” to the local server and accordingly Autodiscover must be set locally.
In the opposite direction, Microsoft has made it easy. Autodiscover from an on-premises Exchange Server to Exchange Online occurs only for the SMTP domain “%tenantname%.mail.onmicrosoft.com”, which is entered as the forwarding address for on-premises users.
The easiest way is to point the Internal DNS entry from Autodiscover to Exchange Online. To do this, the following entry must be made: https://outlook.office365.com/autodiscover/autodiscover.xml
Alternatively, it is also possible to set a key via Registry, that the client should no longer use Autodiscover. This is because Autodiscover is actually no longer so important for Outlook. The Registry setting looks like this:
Windows Registry Editor Version 5.00

[HKEY_CURRENT_USER\SOFTWARE\Microsoft\Office\16.0\Outlook\AutoDiscover]
"ExcludeExplicitO365Endpoint"=dword:00000001
Modify the external Autodiscover Record
This point should be adjusted from the beginning. I describe it only for the reason that this article is complete.
However, the public DNS entry of the mail domain must be set to the public autodiscover of Office 365. Here it is the same entry as the internal DNS: https://outlook.office365.com/autodiscover/autodiscover.xml
Modify an SCP deny for the Clients
Autodiscover was the lowest priority in the hierarchy regarding the Outlook connection. More important is the Service Connection Point for Exchange (SCP)
Tip: The current SCP settings can be viewed in the Active Directory Sites and Services. To do so, you have to use the following path:
expand Services from the console root > Microsoft Exchange > Organization Name > Administrative Groups > Exchange Administrative Group > Servers > select the CAS server and expand > Protocols > AutoDiscover > Right click on the Server Name in the right panel and click Properties as show below.
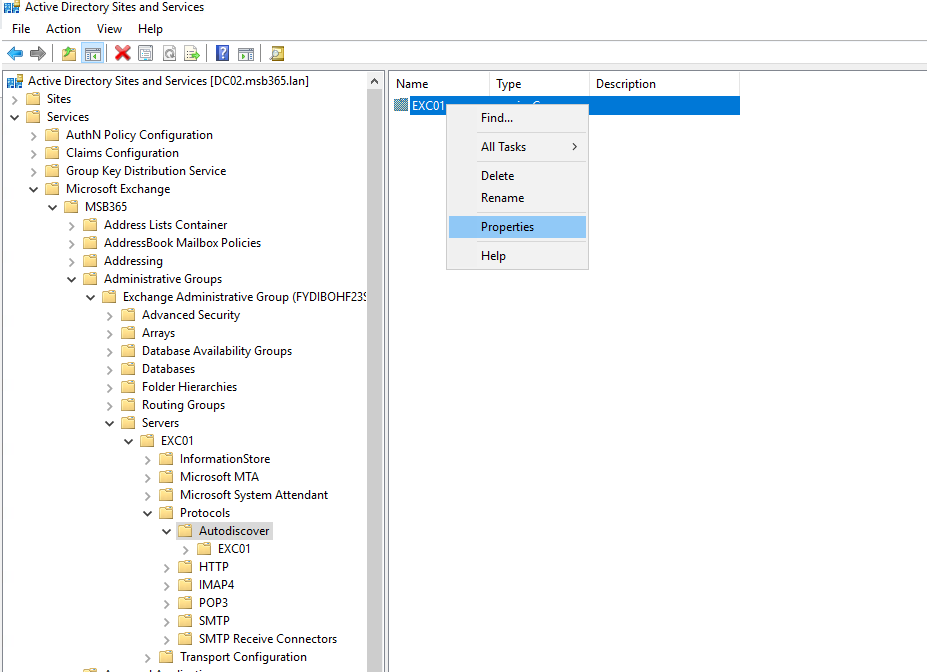

However, as we have seen in the image example, the SCP points to the local Exchange infrastructure.
In the next step I will show you how to disable SCP via the Registry. Similar to the autodiscover it depends on the Office (Outlook) version. Here is a short overview of the versioning:
| Version Name | Version Number |
| Office 2007 | 12.0 |
| Office 2010 | 14.0 |
| Office 2013 | 15.0 |
| Office 2016 | 16.0 |
As already mentioned at the beginning, this does not have to be done for the Office 365 version, because this is by default the first direction Office 365 connected.
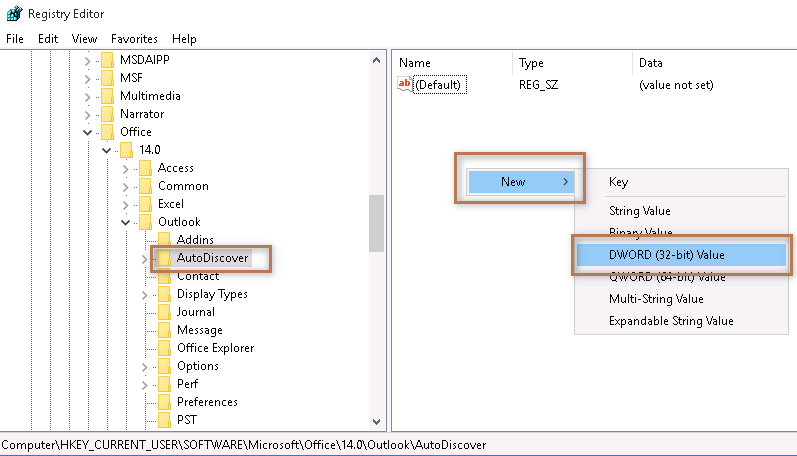
In the Registry Editor we have to browse to the following path:
[HKEY_CURRENT_USER\SOFTWARE\Microsoft\Office\\Outlook\AutoDiscover]
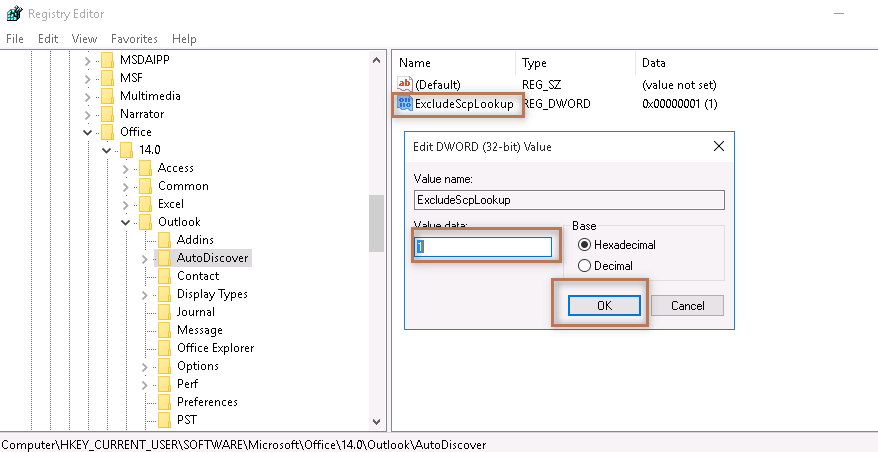
then we create a new “DWord Value” entry with the name “ExcludeScpLookup“.
In the next step we open the newly created entry and set the value “1” as hexadecimal base and confirm with OK
Tip one:
You can also copy the below code to a text file, rename it with .reg extension and double click to merge with your registry. Make sure that you replace the version number X.0 by referring the table above.
Windows Registry Editor Version 5.00

[HKEY_CURRENT_USER\SOFTWARE\Microsoft\Office\X.0\Outlook\AutoDiscover]
"ExcludeScpLookup"=dword:00000001
Tip two:
This registry entry can be distributed very well via GPO. I personally prefer this way.
Inform the users (Mobile device settings)
This step is always optional and only necessary depending on the environment.
Since the initial scenario is such that all users are already working with the Exchange online mailbox, the mobile devices would also have to point to the cloud.
However, depending on the circumstances, it may also be the case that there are devices that are not configured correctly. These would then have to be adapted so that they also point to the Exchange online mailbox.
The Script
Now let’s have a look at the script itself, as i have mentioned earlier in this article, the script can be downloaded for free from the Microsoft Technet Gallery.
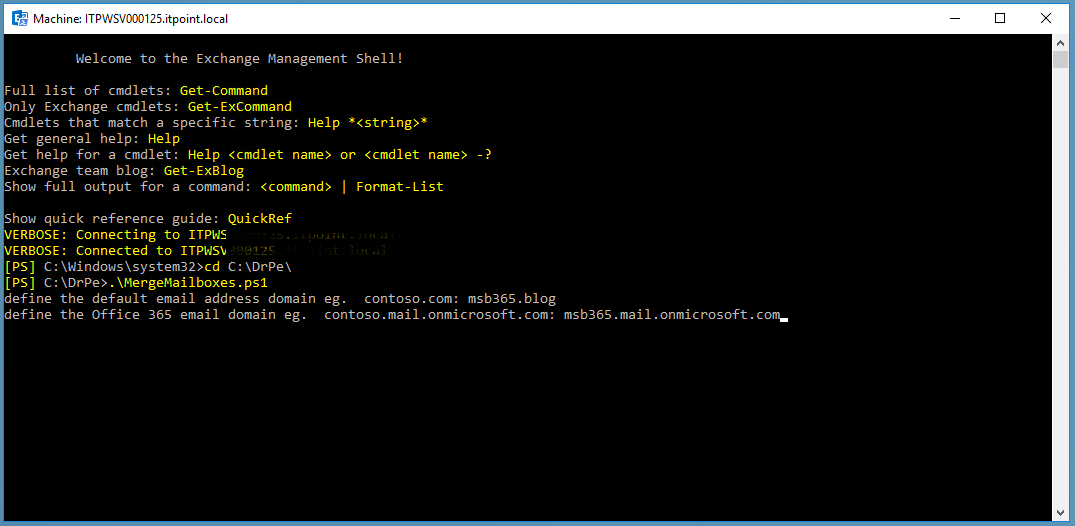
However, when we have completed all pre tasks, we can start the script from the Exchange Management Shell. The script does not need to be modified before use! All individual details will be requested after the start.
After the script is started, we are asked to specify the primary mail domain.
After that we are asked to enter the Exchange online routing address as second entry. This usually looks like this: “%tenantname%.mail.onmicrosoft.com”.
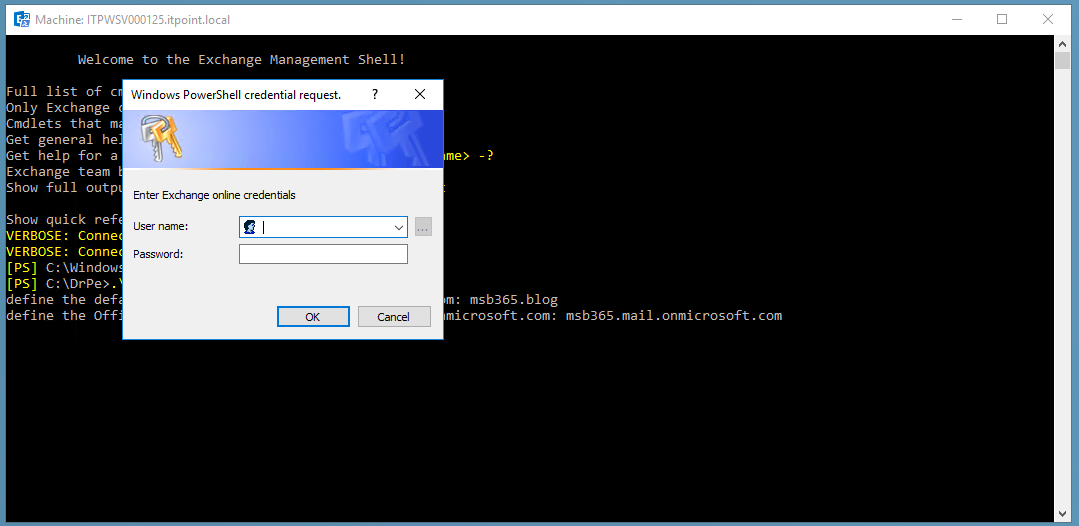
After these two entries have been made, we will be asked to enter our Office 365 (Exchange online) credentials. These credentials are needed so that the script can establish a remote powershell session to the Office 365 Tenant and later read the Exchange GUID of the online mailboxes. No entries are changed online on the Exchange during the entire execution of the script.
The following points should therefore be noted:
– The specified account requires the appropriate permissions to read the required information from Exchange online.
– The script currently does not work with MFA. therefore, it should be an account that is not MFA enabled.
Now all necessary entries are done. Now the script collects all user mailboxes, which are available on the on-premise Exchange infrastructure and lists them in the Management Shell.
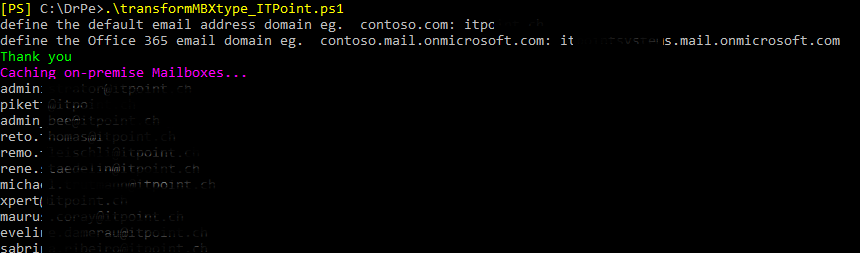
In this step the current homeMDB, homeMTA’s etc. are reseted.
![]()
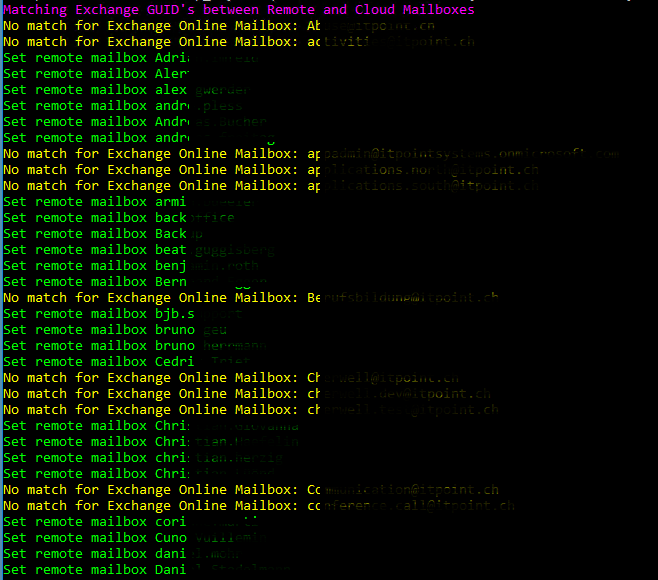
After all on-premise user mailboxes have been read, they are now converted to remote mailboxes.
![]()
In this step we set the individual routing address for each user mailbox (or new remote mailbox).
![]()
Now the script establishes a connection to Exchange online. Here it is extremely important that the credentials we set at the beginning are correct and correspond to the specifications.

After successful connection to Exchange online, the Exchange GUID is read from the Exchange online mailbox and written to the on-premise mailbox.
As you can see in the screenshot, all successful merges are displayed in green and if there are problems, the corresponding message is displayed in yellow.
This helps in the post-processing of the automated process.
At the end, the script automatically refers to the next step, which must now be executed.

Last Steps
Now that everything on the mailbox page has been cleaned up, it’s time to adjust the sync process and run the Hybrid configuration wizard.
Exchange HCW and re-configure AAD
It is important at this point that the on-premise Exchange Server version is updated to the latest version. This maintains a Microsoft supported state and simplifies troubleshooting.
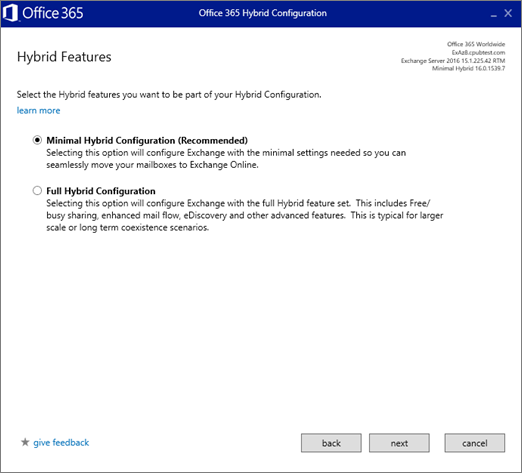
After we have started the Hybrid Configuration Wizard (HCW), we select the option “Minimal Hybrid Configuration”.
On the User Provisioning page, select Synchronize my users and passwords one time.
At this point you are prompted to download and install the Azure AD Connect wizard to synchronize your users from on-premises to Office 365.

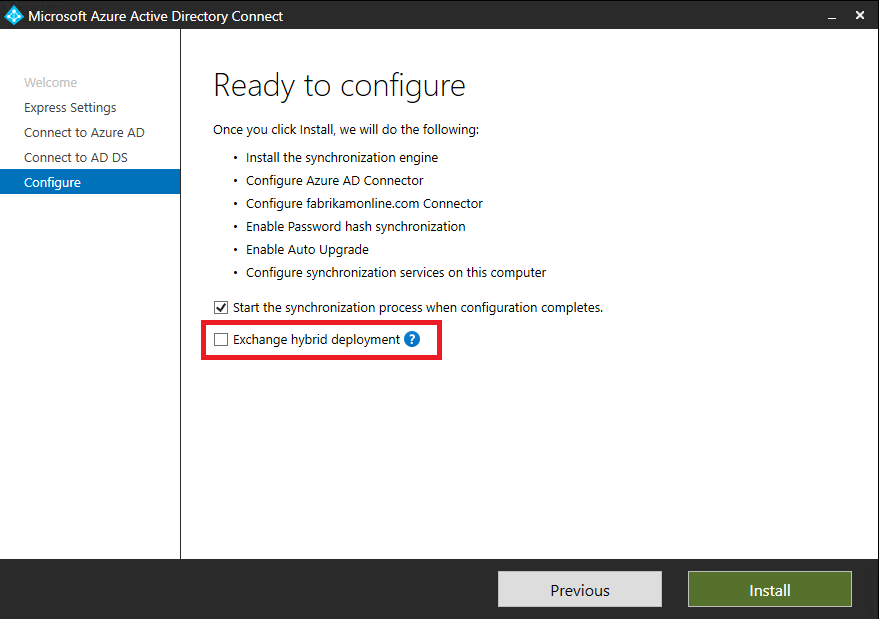
Here we can run it and we can choose the default options for the Express settings.
By configuring the AAD, we need to have an eye on the option “Exchange hybrid deployment” this has to be selected in our case.
Conclusion
As we could see in this article, there is a lot to do in such a task. There may be several reasons why such a starting position was originally created. One of them I have described in this article.
Other reasons can also be attacks on one’s own infrastructure or disasters like a fire that makes an on-premise infrastructure impossible.
It is important to know that it is possible to rebuild an intact hybrid environment, also from the Exchange online perspective.
Good planning is therefore very important.
My script, which is used here should be a simplification and relief for all of you who are facing such a challenge.
I wish you success
😊
Photo by Dominik Scythe on Unsplash